Inserting a List of People, Places or Items (PPI)
Use the PPI List block to create a dynamic list of staff, labs, publications and more.
With the People, Places, Item (PPI) List, you can insert a list posts — in a list or a grid — created using PPI. You can include filters or a search bar, show or hide images, and even use categories to set which PPI posts show up on a given page.
Here are a few examples of PPI Lists in action:
- Adding People to create a faculty or staff directory
- Using Places to list campus locations
- Using Items to list student groups and courses
If you want to enter just one PPI post, we recommend the PPI Individual block instead.
How to use the PPI: List block
People, Places and Items (PPI) are a custom post type. To use this block, you’ll need to have created at least one PPI post first.
New to building pages in blocks? Get to know the block editor »
1. Getting started
Add the PPI: List block.
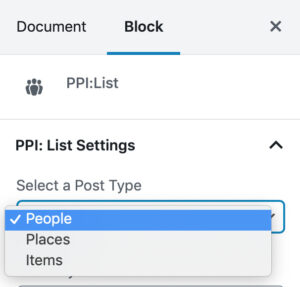
By default, a list of all People Posts will appear. You can change this setting, and all settings described below, in the block settings panel on the right.

2. Choose a post type
From the Select a Post Type dropdown, choose People, Places or Items.
3. Select post order
From the Order by dropdown, choose how you would like your post list to be ordered.
- A > Z or Z > A
Alphabetizes People by the last name field (not by the post title) and Places and Items by post title. - Oldest to Newest or Newest to Oldest
Chronological or reverse chronological order, based on the date the post was published. - Menu order
Custom order (see instructions below)
How to customize post order
- In the left menu of your site’s dashboard, click the post type you’re ordering (People, Places or Items).
- In the All view, drag-and-drop posts into the desired order (changes are saved automatically).
- If you are unable to change the order using drag and drop:
- Go to Plugins in your site’s dashboard
- Activate Post Type Order, then go back to step one.
4. Choose the number of posts per page
Use the slider to increase or decrease the number of posts to show per page.
The maximum number per page is 100; however, we recommend showing 10-30.
If you have more posts than the number you choose to display per page, the posts will automatically be paginated.
5. Select a subset of posts to show, or show all

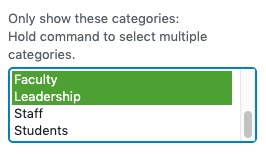
If you’re using categories for People, Places or Items, you can customize your PPI: List to only show posts from one or more specific categories.
In the Only show these categories field, click to select categories, and hold command/control to select multiple.
If you want to show all posts, or if you aren’t using categories, do not make any selections.
![]() Reminder
Reminder
Categories must be created before they can be selected from this list; but any posts added to a category after it has been added to a PPI: List will automatically be added to the list.
6. Display as either a list or grid
From the Display As dropdown, choose List or Grid.
List layout
Lists show one tile per row. This is recommended for tiles with a lot of information and for lists that your visitors will need to fully read or scan.
Grid layout
Grids show multiple tiles per row, with all items per row the same height.
![]() Pro Tip
Pro Tip
To display every post when reordering, click Screen Options in the top right corner of the All view and increase the number of items per page so that you can see all your items at once.
7. Choose the number of items per row
Use the slider to increase or decrease the number of items to show per row.
8. Choose filter settings
All filter settings can be used separately or in combination.
Show (category) filters

If your People, Places or Items are categorized and you chose multiple categories, you can toggle on Show Filters to display a list of categories above your list. This allows site visitors to narrow their list view by category.
Show search
If the Show Search slider is turned on, a small search box will be added to the top of the list, allowing site visitors to search through this subset of posts. This is only recommended for a large volume of posts in a single list.
Show A-Z filter

You have the option to Show A – Z Filter, which will narrow the list view based on the last name field. Only the letters in use will be clickable and will display in red.
A – Z filtering looks best when at least five letters are in use.
Show images
If your posts have featured images, you can choose whether or not to Show images in the tiles. Even if this slider is turned off, the images will still show on the post details page.
Link through to detail page
Turning on the Link through to details page will make the post titles clickable. If post details are minimal and can all be displayed in the tile, or if you have linked your posts to external URLs, we recommend you leave this setting turned off to avoid directing your site visitors to a blank post details page.
Learn more about link through settings »
Adjusting Settings for Places
Choose whether all of your place posts will display with an image or a map.
Creating a Person Post
Add people listings to your site by creating a separate post for each person.
Formatting Text
Add subheadings, body text, links, bulleted lists and more using basic formatting blocks.
Inserting a List of People, Places or Items (PPI)
Use the PPI List block to create a dynamic list of staff, labs, publications and more.
Inserting an Individual Person, Place or Item (PPI)
Use the PPI Individual block to display a single faculty member, office location, research project or other post.
Options for saving drafts, previewing and publishing content
Once a page is live, saved updates are publicly visible. Know your options for controlling the visibility of pages.
People, Places and Items
Use the tool for people, places or items to create directories, filterable lists and more.