Creating an Item Post
Add individual items that you can use to create a filterable list.
Items is a type of content that allows you to create multiple entries that can be grouped, filtered and formatted similarly. It is part of the People, Places and Items plugin.
Anatomy of an Item post
Tile
An Item’s tile includes a photo, title, brief description, and summary.
It can link to a post detail page (see below), a different website or nothing at all.
Where it appears
- When inserted on a page using the PPI: Individual element
- When inserted on a page as part of a list using the PPI: List element
Unlike People and Places, the tile does not appear at the top of the Item’s post detail page.
Post detail page
The post detail page, should you create one, is the Item’s page on your site. It can be accessed through the tile or any other links pointing to it.
The image from the tile appears at full size at the top of the page and is followed by any text or images entered using the content editor.
How to create an Item post
From the left menu of your site’s dashboard, go to Items > Add New, or, from the black admin bar at the top of any page, go to New > Item.
1. Add a title (required)
- Insert a title, or name, for your Item.
- For consistency, make all titles grammatically parallel, and use the same letter case (title or sentence).
Choose which remaining fields to use, and how, based on your content needs. Consistency is the name of the game.
2. Insert brief description
- The brief description displays beneath the Item title on both the tile and the item detail page.
- Add the brief description in the Additional Info section below the title and block editor.
- Make the descriptions consistent in content, length and tone.
3. Choose if linking to an existing page / URL
- By default, the tile links to the post detail page that you are creating.
If you want the tile to link to a different page — whether on your site or another site — enter the URL in the External URL field. - If you don’t want the tile to link to anything, you’ll need to adjust the PPI settings.
4. Add card summary
- The summary appears only on the tile/card. It does not appear on the post detail page.
- If you want the same information to show on the post detail page, too, copy and paste it into body content (see next step).
5. Add body content
Skip this step if you included an external URL or turned off linking for Items.
- The body content is the main content that appears on the item page.
- Add and format the body content in the block editor, just below the post title. You can add images to the body, but for the main image that shows at the top of the item and on its tile, use the featured image instead (step 7).
6. Select categories
- Categories can be used as filters or to embed a subset of Items on a page.
- In the Items Categories box on the right side of the screen, check all relevant categories.
Use categories strategically and sparingly. See the guide to categories »
7. Set featured image
- An Item’s featured image appears at the top of the post detail page and on the tile.
To add an image, go to the Featured Image box on the right side of the screen and click Set featured image. - Upload or select an image from the Media Gallery that is at least 760 pixels wide. If you upload an image that is too small, it won’t display at all.
Tips for featured images
Orientation
- Recommended: Landscape, or horizontally oriented, images with an aspect ratio of 3:2 look best in the featured image space for Items.
- Not recommended: Vertical images
Consistency
Cropping your photos to the same aspect ratio before uploading them can make a huge difference in how they look as a unit if inserted together using the PPI: List element or near each other using the PPI: Individual element.
- For a more polished look, use images that are all the same aspect ratio.
Images are optional
Including a featured image is not required. If you’re categorizing non-visual content like tutorials or research projects, you might skip adding images. Consistency is key — so either all items have featured images, or all don’t.
8. Save, preview, publish
- In the top right corner of the window, click the Save Draft button to save your work without making it live.
- Click Preview to see what the page will look like. The preview will open in a new tab/window. Note that it does not show the summary since that content only appears on the tile. You cannot preview the tile.
- Exit the preview tab/window to return to edit view.
- Click the Publish button to make the Item live. After you’ve published the item, save edits by clicking Update.
Examples
Both items below have titles and featured images. In addition:
- The first item has a brief description and summary
- The second has a brief description but no summary.
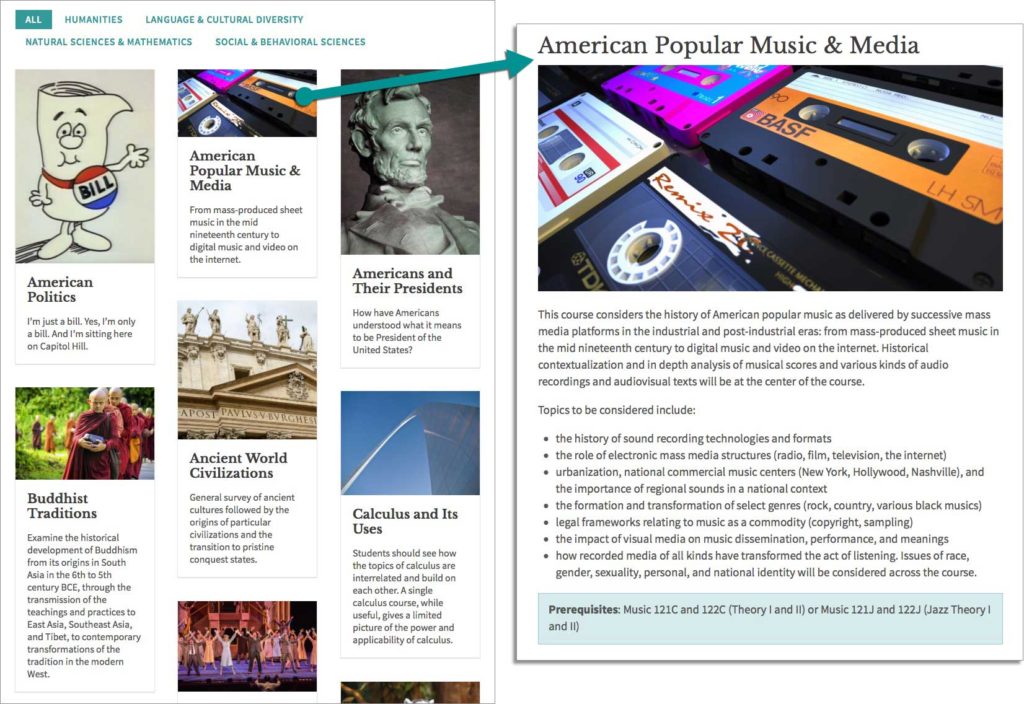
The Surface of Planets
CL1801
Explore fundamental geological processes are responsible for shaping the surface, including both land-forming processes such as volcanism and land-removing processes such as erosion.
Community College Scholarship
Recent community college graduates with a 3.7 GPA may apply for this merit-based scholarship.
Up next
After you’ve created an Item post, you can add the Item’s tile to a page. Create a few more Items posts, and you’re ready to add a list (or grid) of tiles to a page.
Inserting an Individual Person, Place or Item (PPI)
Use the PPI Individual block to display a single faculty member, office location, research project or other post.
Inserting a List of People, Places or Items (PPI)
Use the PPI List block to create a dynamic list of staff, labs, publications and more.
Adjusting Settings for Places
Choose whether all of your place posts will display with an image or a map.
Creating a Person Post
Add people listings to your site by creating a separate post for each person.
Inserting a List of People, Places or Items (PPI)
Use the PPI List block to create a dynamic list of staff, labs, publications and more.
Inserting an Individual Person, Place or Item (PPI)
Use the PPI Individual block to display a single faculty member, office location, research project or other post.
Options for saving drafts, previewing and publishing content
Once a page is live, saved updates are publicly visible. Know your options for controlling the visibility of pages.
People, Places and Items
Use the tool for people, places or items to create directories, filterable lists and more.
Reverting to a previous version of a Page or Post
View the revision history and restore an earlier version of a page or post.