Formatting Text
Add subheadings, body text, links, bulleted lists and more using basic formatting blocks.
When formatting text, stick to the setting and layout options available in the block editor, rather than coding custom colors, fonts and other styles. The predefined styles in the WashU Web Theme make it easy to format content consistently across your site, which in turns makes navigating your site smoother for visitors. It also keeps things on-brand and in compliance with accessibility standards, and it ensures that when the theme is updated, your formatting isn’t left behind.
Have you met the block editor? The WordPress block editor is the new way to edit pages and posts!
Jump to a section below:
Avoid the Classic Block: If your site migrated into blocks from the older version of WordPress, you may be tempted to keep using the Classic Block, which resembles the former content editor. However, the Classic Block is not supported, and pages using it may eventually break.
Paragraph block
Newly added blocks always default to the paragraph block. This versatile block includes basic text formatting, links, disclaimers styles and more.
Using the paragraph block
- Add a paragraph block to the page or post you’re working on (or simply begin typing on the page!).
- Add basic styling (bold or italics) and alignment options by highlighting the text and selecting from the toolbar at the top of the block.
Special paragraph formats: Disclaimers and lead/intro text
Select Styles from the panel on the right to apply a special format to any paragraph block:
- Disclaimer:
Used at the bottom of a page for legal text, disclaimers or footnotes, disclaimer text will appear in italics and smaller than the body copy.
- Lead:
Use this at the top of priority pages to style two to three lines of intro text in a larger, gray typeface.
Pro Tip: Press Enter/Return to add a new paragraph block. For a soft return (line break within the same paragraph block), hold Shift + Enter/Return.
Links
Link text should be concise but descriptive. Avoid links that say “Click here” or “Learn more” and instead use descriptive text that indicates the destination and content. A visitor should be able to skim the links on a page and understand what they’re linking to without reading the full sentence.
Pro tip: Use links effectively »
- Highlight the text to link.
- Click the Link icon (looks like links of a chain) from the top toolbar, or use keyboard shortcut (PC: ctrl + k / Mac: cmd + k).
- Add the link’s destination:
- Page or post on your site: Start typing the page title and select from the options that appear below.
- Page on another site: Insert the full web address in the URL field.
- Email address: Type the full email, rather than hyperlinking generic text like “email us” (i.e., Email us at sites@wustl.edu). Then, highlight the email and click the Link icon. Your text will automatically generate a link for email.
- File/document (pdf, xls, ppt, etc): See tutorial for linking to documents.
- Subsection on a page (anchor links): See the tutorial for adding anchor links.
- Do not set links to open in a new window/tab (this goes against best practice for accessibility).
- Click the apply button ⏎ to save the link.
To remove links, select the link text and click the unlink icon (broken chain) from the top toolbar.
Heading block
Headings and subheadings establish a visual hierarchy for a page’s content. For those using screen readers, they also make navigating pages much easier, allowing site visitors to skip to the section they need.
Avoid using billboards, cards, or custom HTML to create de facto section headings, and stick instead with the heading block! If the headings on a page need extra oomph, see Step 3 below for adding the underline style.
Pro tip: Write effective headings and page titles »
Using the heading block
- Add a heading block, or transform a paragraph block into a heading block.
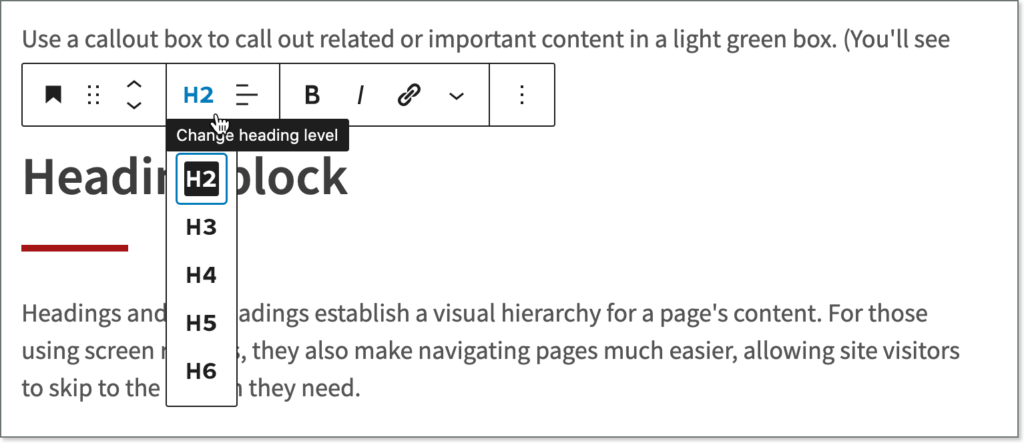
- Select the appropriate heading level (H2, H3, H4, etc.) from the dropdown in the block’s top toolbar, as shown in the screenshot below. The heading block defaults to H2.
- Optionally, you can add an underline style to headings. On text-heavy pages or pages with headings at multiple levels (like this one!), the underline style helps establish relationships between those sections. Use underlines sparingly, especially for H3 through H6, since underlines can have the effect of visually separating content that you might prefer to hang together.
To add underlines: Select the heading block; then in the settings panel on the right, change the style from Unstyled to Underline. H2s have the additional option to select an accent color (this page uses the red accent). We recommend using these colors consistently throughout the pages of your site.
How to use the right heading levels (H2, H3, H4)
Consider headings and subheadings as an outline that structure your content:
- The page title is automatically the Heading 1 (H1). The title is the only text on a page that should be an H1. This is a Google rule!
- Within the body content, start with Heading 2 (H2). If the content within the H2 section needs be further subdivided, use an H3. If that content needs to be subdivided, use the H4, and so on. For the next main section of the page, go back to an H2, like the levels of an outline.
For example, the heading levels so far on this page are:
- H1 (the page title): Formatting text
- H2: Paragraph block
- H3: Using the paragraph block
- H3: Special paragraph formats: Disclaimers and lead/intro text
- H2: Links
- H2: Heading block
- H3: Using the heading block
- H3: About heading levels
- H2: Paragraph block
List block: Bullet points and numbering
Lists are useful for organizing and summarizing key information or outlining a high-level ordered list with substeps (like this tutorial!).
Ordered lists (numbered)
- A numbered list is an example of an ordered, styled list.
- When to use: Use numbered lists to outline steps that should be performed in a specific order.
- You can style subtasks of any list type in an ordered (a, b, c) or unordered (bulleted) format.
Unordered lists (bullets)
- A bulleted list is an example of an unordered, styled list.
- When to use: Use bulleted lists when order may not matter.
- Unordered lists are useful for listing items like available courses, program benefits, features or notable alumni.
Unstyled lists
- This is an example of an unstyled list.
- The text is indented, like an ordered or unordered list, but there are no numbers or bullet points.
- It might be tempting to use the unstyled list as a way to indent sections of text, but this is not recommended. Lists use semantic code to provide context and meaning for screen readers and search engines. (In plain English: only put content in lists that belong in lists.)
Using the list block
- Add the list block, or transform a paragraph block into a list block. Learn more about transforming blocks below.
- In the right panel, select a list style. Style options are Regular or Unstyled.
- Regular lists use styled icons (numbers or bullet points) to organize information.
- Unstyled lists are indented and do not use styled icons.
- Select unordered or ordered from the block settings in the top toolbar.
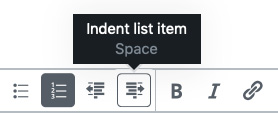
- Create sublists by indenting an existing list item. Place the cursor in front of the list item you wish to indent and select Indent list item in the top toolbar. If you decide a sub-list belongs as a new list item, you can select Outdent list item.
Callout box block (green box)
Use a callout box to call out related or important content in a light green box. (You’ve seen several examples on this page!)
Transforming to a different block
You can easily change some blocks from one type to another — e.g., from a paragraph block into a list block and back — using the transform option.
- Select the block you want to change.
- Hover over the block icon (the first icon) in the top toolbar until you see the Change block type or style icon (looks like a pair of arrows). Click the icon.
- Under Transform To, select a different block.
Adding a New Section with Multiple Pages
After you’ve launched your site, you may want to add a new top-level page with subpages, but this can be a little tricky with a live menu.
Adding New Pages
Use pages for relatively static content that makes up the architecture of your site.
Formatting Text
Add subheadings, body text, links, bulleted lists and more using basic formatting blocks.
Options for saving drafts, previewing and publishing content
Once a page is live, saved updates are publicly visible. Know your options for controlling the visibility of pages.
Reverting to a previous version of a Page or Post
View the revision history and restore an earlier version of a page or post.
Understanding & Editing Permalinks (URLs)
By default, a page’s URL matches its title. You can edit the URL by changing the slug.
Using Blocks: An Intro to the Page Editor
Laying out pages and editing content is a snap with your site’s block editor.