Creating Custom Menus
You can override your site's automatically generated menus if customization is needed.
For most sites, we recommend using the web theme’s default menu builder instead of a custom menu. However, depending on your goals, you may have good reasons to create a custom menu for your site.
Jump to a section:
- Reasons for creating custom menus
- Reasons to avoid custom menus
- Creating and editing a custom menu
- Reverting to the default menu
Reasons for creating custom menus
- Shortening page names in the menu
If you have a long page name or crowded main menu, you may want to abbreviate a page title as it appears in the main menu. For example, a page titled “Seminars & Conferences” could appear as “Events” in the main menu.
![]() Important!
Important!
Changing a page title in the custom menu only controls how it appears in the main menu and dropdowns and the mobile menu. The sidebar menus will not change.
See the different menu types »
- Hiding pages from the navigation menus
In general, every page should appear somewhere in the navigation. In rare cases, however, you might have good reason to keep a page out of the menu, such as a confirmation page that should only be seen after a form is submitted, or a secret page that you will share via a link.
Keep in mind: Pages hidden from the navigation may still appear in search results, including site search and Google. - Eliminating dropdown menus
Though it’s possible to create a main menu with no dropdowns, we advise against it. Dropdown menus are a key navigation element that provide a consistent experience across all WashU Web Theme sites.
If a section has lots of subpages, thus making the dropdown menu overly long, consider restructuring your site. You might categorize some of the child pages under another parent page, or create that content as news posts or items instead of pages. - Linking off-site
We advise against including off-site links in your site menus, except in rare circumstances. The Office of Human Resources menu, for example, includes a link to HRMS, a system employees use to complete essential tasks. HRMS is a core HR application and many site visitors (prospective employees not included) will recognize it as an off-site property before clicking it.
If you’re considering an off-site menu link, weigh the risks and benefits of sending visitors to another property straight from your main menu. Typically, it’s better to include off-site links within the content of your pages. If you’re simply listing websites for related groups, you can create a link list in the footer instead.
Reasons to avoid custom menus
We generally recommend sticking with the default menu — unless, of course, your needs warrant customization (as above). We don’t have a laundry list of reasons to avoid customization, just one important warning:
- Extra maintenance (increases risk)
The default menu is much simpler to maintain than a custom menu. Using the theme’s automatic menu, all you have to do is set the page’s parent, and order it among the other pages.
With custom menus, however, you have to 1) set the page’s parent and order and 2) add the page to the separate custom menu builder.
The risk is remembering both steps every time you add a new page or update the menu. Forget the first part, and the sidebar menus and page URLs don’t match the perceived site structure. Forget the second, and the new page won’t appear in the main menu.
Of course, remembering both steps can be simple enough, especially if just one person manages your website and is an expert in all of the ins and outs. Custom menus are a greater risk for sites that are only occasionally updated or that are updated by multiple people.
Creating and editing a custom menu
The custom menu builder controls a site’s header menu, including dropdowns, and the mobile menu. It does not control the sidebar menus, which must be edited separately. Learn all about site menus in the WashU Web Theme.
1. Switch from default to custom menu (first time only)
You’ll only need to do this part once:
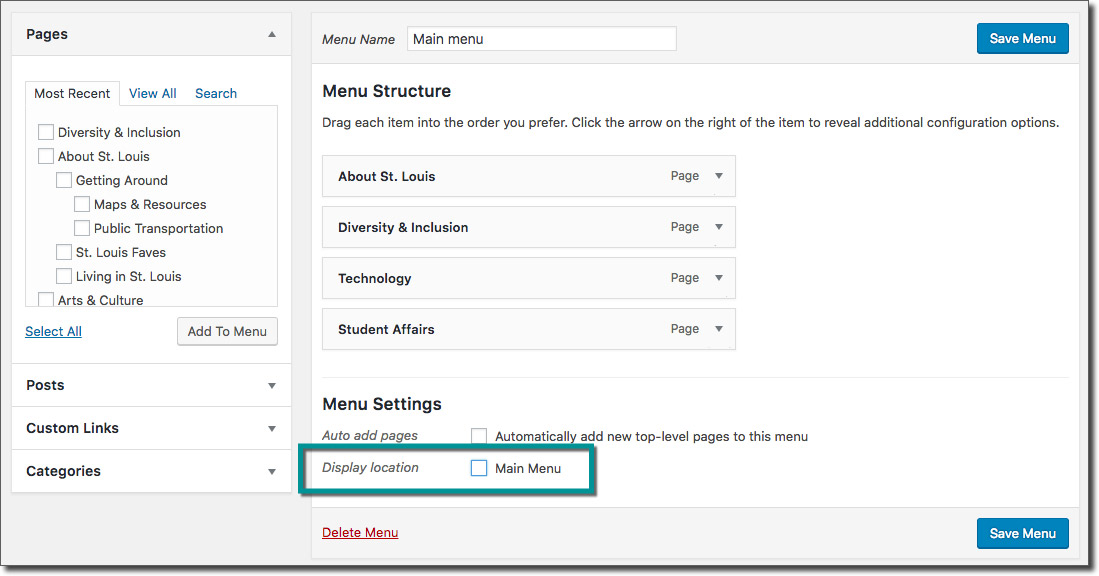
- From your site’s dashboard, go to Appearance > Menus.
- At the top of the page, make sure the correct menu is selected to edit: Header (Main Menu)
- At the bottom of the page, under Menu Settings, next to Display location, check the Main Menu box.
If you do not see this option, you must first click Create Menu.
Do not click Save Menu until you are ready for the custom menu to replace your existing one. The custom menu won’t be visible on your site until you click save.
2. Add pages to the menu structure
The pages that will appear in your site’s header menu are listed under Menu structure. You can add any published page from your site to the menu structure.
- At the top of the page, make sure the correct menu is selected to edit: Header (Main Menu)
- Find the Pages box on the left.
- Check the boxes next to pages to add to the menu.
- Click Add To Menu.
- The pages will be added to the bottom of the menu.
Pro tip: Pages on the left are listed under three tabs: Most Recent, View All and Search.
3. Drag and drop pages to set the page order
Under Menu structure, drag and drop pages into the order you want them to appear in the menus.
Top to bottom = Left to right
4. Create dropdown menus by indenting child pages under the parent
To add subpages to the dropdown menus, nest them under the appropriate parent page with one indent.
Though it’s possible to indent pages more than one level, doing so will cause them to drop off the menu. On the other hand, if you miss an indent, the page will appear as a top-level page instead of in the dropdown.

5. Remove unwanted pages
To remove a page from the menu, click the down arrow to the right of the page name, then click Remove.
6. Edit page names
If a page has a long name, you my want to truncate the title as it appears in the site menu. For example, you could shorten “About the Department of English” to “About Us.” The full name will still display as the title when someone views that page.
To edit the label, click the arrow to the right of the page name and edit the Navigation Label.
7. Save your work!
Click the Save Menu button (either one).
8. Edit the sidebar menus
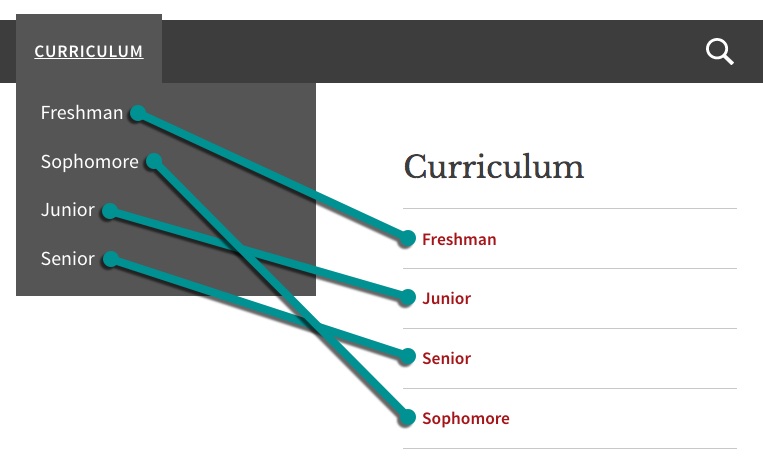
Because the custom menu controls only the header menu, the sidebar menus have to be edited separately. The sidebar menus and dropdown menus should match.
How to edit the sidebar menu »
9. Check your work
- Inspect the main menu, and hover over all page titles to view the dropdown menus. Check that everything is in order.
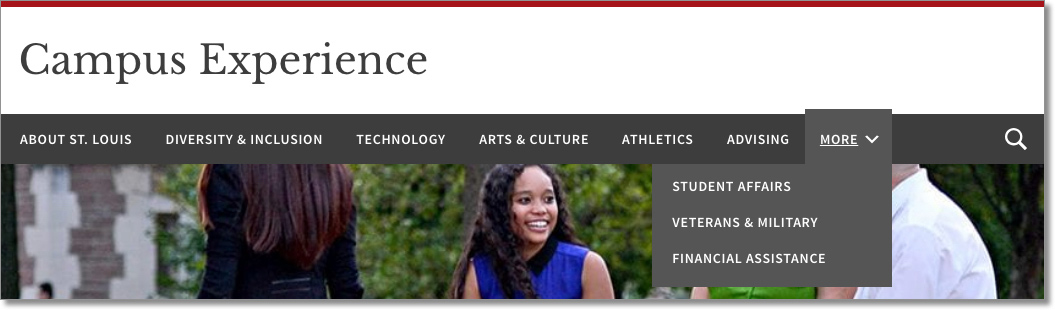
- Make sure your most important pages show in the menu when viewed on a typical desktop monitor. If a menu includes more pages than there is room to display, pages will shift into a “More” dropdown at the right of the menu bar, as shown in the screenshot below.
- Click into each top-level page and compare the dropdown to the sidebar menu (they should match). Remember, the dropdown and the sidebar menus are edited separately, so you still need to follow the steps in the page ordering tutorial.
Reverting to the default menu
It’s simple to switch to the default menu. After you switch, your header menu will be controlled by page order, which already controls your sidebar menus.
Before you switch to the default menu:
The default menu will go live immediately, so make sure it’s ready to go!
Edit the site menus »
- From your site’s dashboard, go to Appearance > Menus.
- Under Menu Settings, next to Display location, uncheck the Main Menu box.
- Click the Save Menu button (either one will do the job).
To reactivate the custom menu, simply re-check the Main Menu box and Save.