Setting Redirects
A redirect automatically forwards a website’s visitors from one URL (web address) to another.
Redirects help a website’s visitors get to the right place when a link to a page — its URL — has changed or is shortened. Redirects also tell search engines like Google that an existing page has moved or been merged, which is critical for search engine optimization (SEO).
Why set redirects
You might set redirects on your website for several reasons, including:
- Launching a new site: If a new website is replacing an existing site, some or all of your page URLs will change. You need redirects! (Learn more about redirects for new website launches.)
- Moving a page or changing its title/URL: If you assign a page a new or different parent page, the child page’s URL will change. Similarly, if you update a page title and change the permalink to match, the URL will change. Either way, you need a redirect!
- Creating a vanity URL: If you need to truncate a long URL for a print piece, campaign or other communications, you need a redirect! For example, obgyn.wustl.edu/forms redirects to obgyn.wustl.edu/patients/covid-19-patient-guidelines/patient-forms/.
When to set redirects
If you’re launching a new site that replaces an existing site:
Follow the directions below to set up your redirects before the new site goes live. Until the new site goes live, the redirects you set will not affect your current website.
If you’re setting a redirect for any of the other reasons listed above:
Set it as soon as you need it. Redirects added to a live site will go into effect immediately when set.
Replacing an existing site? Learn more about preparing and setting redirects when moving from one site to another.
How to set redirects
WashU Sites / CampusPress sites use a plugin called Safe Redirect Manager. Internally hosted websites use the Redirection plugin. Follow the instructions below for your site’s hosting environment.
- From your site’s dashboard, go to Tools > Safe Redirect Manager in the left menu.
- Click the button Create Redirect Rule at the top of the screen.
- Redirect From: Enter the relative URL of the page you’re redirecting traffic from. This is the link to the original page, or the vanity URL. The relative URL is the path after the site domain, including the forward slash (/). For example:
- Full URL (site domain is underlined): https://sites.wustl.edu/bears/athletics/womens-volleyball/
- Relative URL (use this!): /athletics/womens-volleyball/
- Redirect To: Enter the full URL of the page you’re redirecting traffic to.
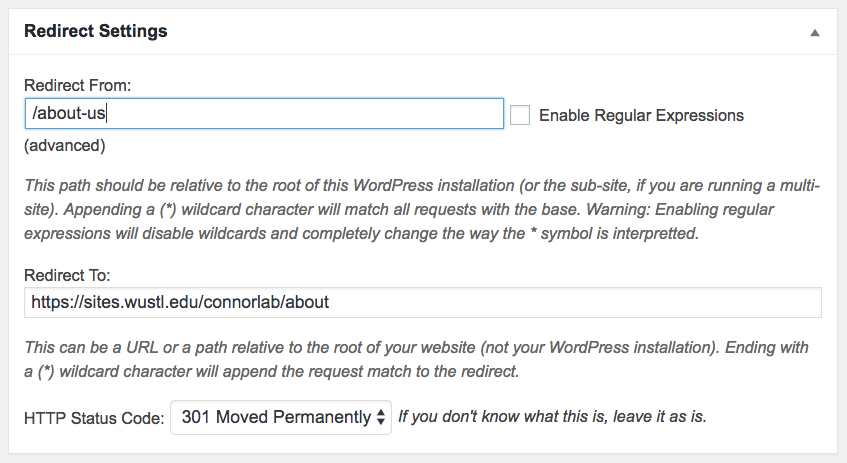
- Change the HTTP Status Code to 301 Moved Permanently.
- Click Publish.
- Test your redirect by going to the “from” URL and making sure it redirects to the page correctly.
The Safe Redirect Manager plugin ignores trailing slashes and it is not case sensitive.
This means you can enter any of the following variations into the “Redirect From” field with the same result: /seo • /seo/ • /SEO • /SEO/
1. Access the Redirection plugin
From the WordPress dashboard, click Tools > Redirection in the left menu.
If Redirection doesn’t appear under Tools, contact sites@wustl.edu to request adding the Redirection plugin to your site.
2. Change global settings
Adjusting a few global settings will make your life easier with every redirect you set! You only need to change these settings once.
- Click Options
- Find Default URL settings, and check both settings to enable them: Case insensitive matches and Ignore trailing slashes
- Find Default query matching, and select Ignore all query parameters
- Click Update
3. Set individual redirects
- On the main Redirects tab, click Add New
- Complete these fields:
- Source URL: The relative URL of the page you’re redirecting traffic from, starting with a forward slash /. This is the original link of the page that’s moving, or the vanity URL. The relative URL is everything after .edu.
Example from obgyn.wustl.edu: /forms (truncated from https://obgyn.wustl.edu/forms)
- Target URL: New page address (the URL where traffic is redirected), starting with a forward slash / (everything after .edu)
Example from obgyn.wustl.edu: /patients/covid-19-patient-guidelines/patient-forms/ - To the right of the Source URL, select Ignore Case and Ignore Slash if they are not already selected.
- Source URL: The relative URL of the page you’re redirecting traffic from, starting with a forward slash /. This is the original link of the page that’s moving, or the vanity URL. The relative URL is everything after .edu.

For both fields, start with a forward slash / and enter the part of the URL following .edu.
- Click Add Redirect
- Test your redirect by going to the source URL and making sure it redirects to the page correctly
4. Or, bulk import many redirects at once
The bulk import option is particularly useful if you are replacing a website and have dozens or even hundreds of redirects to set at once. If you are replacing a site, remember to send WashU Medicine Marketing & Communications a request to set a subdomain-level redirect as well.
- In a spreadsheet, list the source/original URL in Column A, and the corresponding target URL in Column B. Do not include column labels or additional columns.
- The source and target URLs should be truncated. That is, the domain should be removed so the URL starts with the forward slash (see examples in section above). Pro tip! If your spreadsheet lists the full URL for each page, you can truncate the URLs en masse by running a FIND and REPLACE. FIND should be the domain name without the trailing slash (eg, https://yoursite.wustl.edu). Leave REPLACE blank.
- Save the file as a CSV.
- Navigate to your site’s Redirection page and click Import/Export at the top.
- In the Import section, add your file and click Upload.
- Test your redirects! If you’ve set too many redirects to test all of them individually, run a spot check. You can also contact WashU Medicine Marketing & Communications to run a report that will help identify any issues.
If you would like to apply advanced options, visit the Redirection website for additional support.