Inserting a Table
Organize parallel types of information in a grid to enhance scannability and comparison of data.
Let’s be honest: Tables on websites are often terrible! Gridded text on narrow pages can feel overwhelming and claustrophobic. On a mobile device, the first two columns may be all that you see — or the text may wrap excessively in too-narrow columns. And for people using screen readers, tables can be disorienting, especially if headers aren’t properly labeled.
So the first rule of using tables is…don’t use tables! Unless the information needs to be compared across rows and columns, listing it under separate headings rather than in a table will be much easier to process.
That said, a tabular format is unmatched when it comes to repeating the same type of information in a consistent, correlated format. (So the second rule of using tables? Use tables when they make sense!)
Tips for using tables
- Present parallel data points that users want to compare.
- Use the header section to label each column (important for clarity and accessibility!); we cover this in step three below.
- Limit to three to four columns, depending on length.
- After you create a table, check the layout on a mobile device.
How to use the table block
New to building pages in blocks? Get to know the block editor »
- Add a table block.
- Enter the number of columns and rows. (You can add or delete rows and columns after the table has been inserted.)
- Add headings to the first row by toggling on Header section in the block settings panel on the right. This setting is important for screen readers to interpret your table properly.
- To adjust the column width, select fixed width from the block settings panel on the right. (See examples below.)
- If set to fixed, all columns will be the same width, and text that is longer will wrap to the next line.
- If not fixed, a column’s width will grow to accommodate longer text, decreasing the width of surrounding cells.
- To add or delete rows and columns, click within a cell, then click the edit table icon in the settings menu at the top of the block.
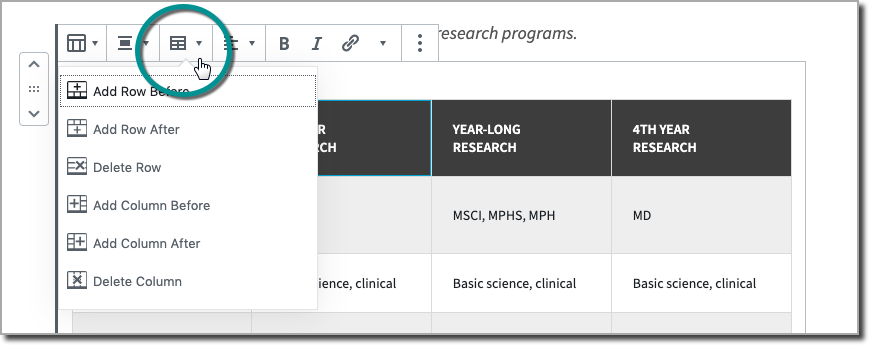
Table examples
Comparing program features
The table below helps students compare multiple research programs.
| RESEARCH PROGRAM | Eligible degree programs | Duration | Funding available | Ideal for |
|---|---|---|---|---|
| SUMMER RESEARCH | MD | 3 mos. | Fully funded by stipend | Introduction to research |
| YEAR-LONG RESEARCH | MSCI, MPHS, MPH | 10-12 mos. | Varies by program | In-depth training |
| 4TH-YEAR RESEARCH | MD | 6 weeks | None | Preparation for residency |
Displaying schedules: To table, or not to table
Because schedules repeat the same kind of information for each event — time, location, description, etc. — they’re often listed in table format. However, tables can make schedules difficult to process because individual event information is spread across rows rather than chunked into scannable sets.
Imagine you’re looking for a group training session on the Medical Campus…
You can locate that information in the table below, but it requires looking for information in two different columns — training type and location — simultaneously:
| Training Type | Date | Time | Location |
|---|---|---|---|
| Group Training Session | 10/2 | 1:30-3pm | University Marketing & Communications, 3rd floor Danforth Campus |
| Open Office Hours | 10/2 | 3-4:30pm | University Marketing & Communications, 3rd floor Danforth Campus |
| Group Training Session | 11/7 | 1:30-3pm | Mid Campus Center, Room 2057 Medical Campus |
| Open Office Hours | 11/7 | 3-4:30pm | Mid Campus Center, Room 2057 Medical Campus |
| Group Training Session | 12/4 | 1:30-3pm | University Marketing & Communications, 3rd floor Danforth Campus |
| Open Office Hours | 12/4 | 3-4:30pm | University Marketing & Communications, 3rd floor Danforth Campus |
An alternative would be to simply list each training event as a separate chunk of information in paragraph blocks. (Include one event per paragraph block, and use soft returns to single-space within each block.)
You also might separate events into relevant groups. In this case, those might be training type (group session or office hours), or location (Danforth Campus or Medical Campus). How you group them depends on which factor is more significant to your users.
Here’s the same schedule as above, with events grouped into cards by location:
Danforth Campus
University Marketing & Communications, 3rd floor
270 N Skinker Blvd.
Map location »
OCTOBER 2
1:30 – 3 pm: Group Training Session
3 – 4:30 pm: Open Office Hours
DECEMBER 4
1:30 – 3 pm: Group Training Session
3 – 4:30 pm: Open Office Hours
Medical Campus
Mid Campus Center, Room 2057
4565 McKinley Ave.
Map location »
NOVEMBER 7
1:30 – 3 pm: Group Training Session
3 – 4:30 pm: Open Office Hours
As a wise person has probably said, sometimes the best table is no table at all!